LAMP (Linux, Apache, MySQL, PHP) stack means Linux, Apache, MySQL and PHP together. LAMP is one of the first open source software stacks for the web and is one of the most common ways to deliver web applications. In this tutorial, you will learn How to Install Apache, MySQL, PHP (LAMP) Stack on Ubuntu and configure a web server.
Prerequisites:
A root user or user with sudo privileges required to install Apache, MySQL, PHP (LAMP) Stack on Ubuntu 20.04 / 18.04 / 16.04.
Step 1: Install Apache
To install Apache, execute the following commands. It will update our package list and install the Apache webserver.
sudo apt update
sudo apt install apache2Step 2: Configure Firewall
After installing the Apache web server, now you have to configure the firewall. you will need to adjust your firewall settings to allow HTTP traffic.
- Apache: Apache opens only port
80. Port 80 is used for normal, unencrypted web traffic. - Apache Full: Apache Full opens both port 80 and port 443. Port 80 is used for normal, unencrypted web traffic and port 443 used for TLS/SSL encrypted traffic.
- Apache Secure: Apache Secure opens only port
443. Port 443 used for TLS/SSL encrypted traffic.
sudo ufw allow in "Apache"
sudo ufw enablesudo ufw statusYou can check Apache current service status from the following command.
sudo service apache2 status
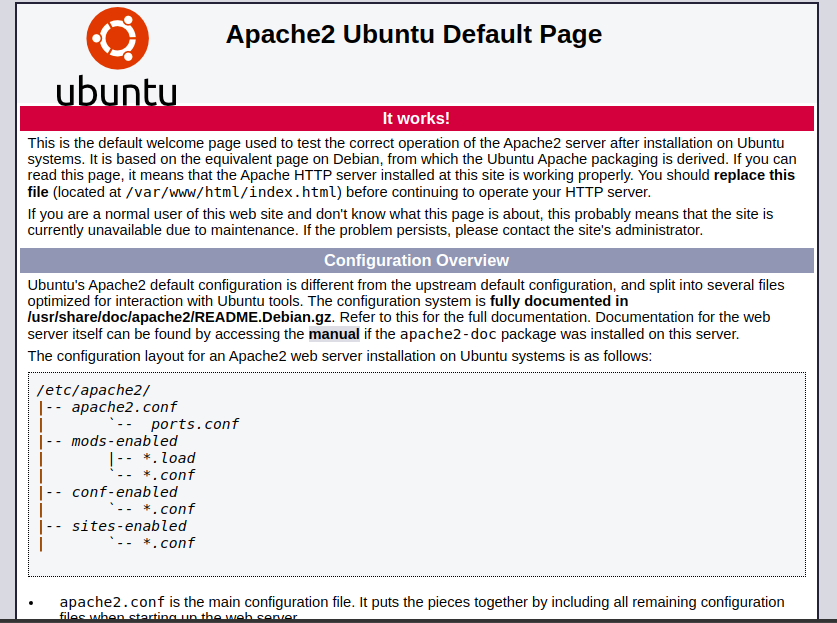
If the Apache service is active and running, Now you can view the default Apache web page through your web browser.
Enter the public IP address of your server in the address bar or use http://your_server_ip and hit ENTER. If you don’t know your IP, you can find out with the following command.
ip addr show eth0 | grep inet | awk '{ print $2; }' | sed 's/\/.*$//'You will get two or three lines in output for IP address. They are all correct addresses, but your computer may only be able to use one of them, so try each one.
If the above command is not working or you are getting Device "eth0" does not exist. You can also use curl http://icanhazip.com to get your public IP address.
Step 3: Install MySQL
MySQL is a database system used to store and manage data. It is a popular database management system used within PHP environments. Use the following command to install MySQL.
Confirm installation by typing Y, and then ENTER
sudo apt update
sudo apt install mysql-server
After installing the MySQL server. You can check MySQL status using the following command.
sudo service mysql statusoutput:
mysql.service - MySQL Community Server
Loaded: loaded (/lib/systemd/system/mysql.service; enabled; vendor preset: enabled)
Active: active (running) since Thu 2021-06-17 15:46:58 UTC; 7min ago
Main PID: 10901 (mysqld)
Status: "Server is operational"
Tasks: 37 (limit: 1136)
Memory: 321.4M
CGroup: /system.slice/mysql.service
└─10901 /usr/sbin/mysqld
You may need to press q to exit the service status.

Configure MySQL Security
Now configure MySQL using the following command. This command will remove some insecure default settings and lock down access to your database system.
sudo mysql_secure_installationoutput:
You will ask if you want to configure the VALIDATE PASSWORD component. It is advised to skip this step. Press Enterif you don’t want to set up the validate password component. Actually the specified criteria for creating a strong password for MySQL server. If VALIDATE PASSWORD component is enabled and the password which doesnot match the specified criteria will be rejected by MySQL with an error.
Securing the MySQL server deployment.

Connecting to MySQL using a blank password.

VALIDATE PASSWORD COMPONENT can be used to test passwords
and improve security. It checks the strength of password
and allows the users to set only those passwords which are
secure enough. Would you like to setup VALIDATE PASSWORD component?

Press y|Y for Yes, any other key for No:
Now, You will be asked to create the password for root. Always create strong and unique passwords.
Please set the password for root here.
New password:

Re-enter new password:
Remove Anonymous Users
Now, You will be asked to remove anonymous users. Press Y and click Enter to remove anonymous users.
By default, a MySQL installation has an anonymous user,
allowing anyone to log into MySQL without having to have
a user account created for them. This is intended only for
testing, and to make the installation go a bit smoother.
You should remove them before moving into a production
environment.
Remove anonymous users? (Press y|Y for Yes, any other key for No) :
Disable Remote Root Login
Now, You will be asked to Disallow root login remotely. Press Y and click Enter to Disallow root login remotely.
Normally, root should only be allowed to connect from
'localhost'. This ensures that someone cannot guess at
the root password from the network.

Disallow root login remotely? (Press y|Y for Yes, any other key for No) :
Remove Test Database
Now, You will be asked to Remove test database. Press Y and click Enter to Remove test database.
By default, MySQL comes with a database named 'test' that
anyone can access. This is also intended only for testing,
and should be removed before moving into a production
environment.


Remove test database and access to it? (Press y|Y for Yes, any other key for No) :
Reload Privilege Tables
Now, You will be asked to Reload privilege tables. Press Y and click Enter to Reload privilege tables.
Reloading the privilege tables will ensure that all changes
made so far will take effect immediately.

Reload privilege tables now? (Press y|Y for Yes, any other key for No) :
Test MySQL
After finishing the above step for MySQL. You can now login to MySQL console using sudo mysql
sudo mysqloutput:
Welcome to the MySQL monitor. Commands end with ; or \g.
Your MySQL connection id is 10
Server version: 8.0.25-0ubuntu0.20.04.1 (Ubuntu)

Copyright (c) 2000, 2021, Oracle and/or its affiliates.

Oracle is a registered trademark of Oracle Corporation and/or its
affiliates. Other names may be trademarks of their respective
owners.

Type 'help;' or '\h' for help. Type '\c' to clear the current input statement.

mysql>

You have successfully installed and configured MySQL.
To exit from MySQL, type exit.
mysql> exitStep 4: Install Php
The next step for installing LAMP Stack is to install Php. First, update the repository and then install the PHP package. You can update the repository and install the PHP package using the following command in terminal. We are also installing two more packages libapache2-mod-php and php-mysql, it will allow PHP to communicate with the MySQL database.
Press y and ENTER when prompted to install the PhP libapache2-mod-php and php-mysql package.
sudo apt updatesudo apt install php libapache2-mod-php php-mysqlTest PHP
After installing the PHP package. You can check PHP version using the following command in terminal.
php -versionThe output should look like this.
output:
PHP 7.4.3 (cli) (built: Oct  6 2020 15:47:56) ( NTS )
Copyright (c) The PHP Group
Zend Engine v3.4.0, Copyright (c) Zend Technologies
    with Zend OPcache v7.4.3, Copyright (c), by Zend Technologies
Now it’s time to check PHP. Create a info.php file in root directory using nano command. Use following command in terminal to create a info.php file in root directory.
sudo nano /var/www/html/info.phpAfter using the above command nano editor will be open. Copy and paste the following code in nano editor and then press CTRL + X, press Y and then press ENTER to save and exit.
<?php
phpinfo();
Now use the following line as a URL in your favourite browser to load PHP file.
http://Your_IP_Address/info.php or http://Your_Domain/info.php
Your loaded PHP file should look like this.
For security reasons, Now it’s time to remove info.php file, that you have been created. Use the following command in terminal to remove info.php file.
sudo rm /var/www/html/info.phpCongratulation, You have successfully installed LAMP Stack in Ubuntu 20.04 / 18.04 / 16.04.
Creating a Virtual Host for your Website (Optional)
<html>
  <head>
    <title>My First Website</title>
  </head>
  <body>
    <h1>Hey! Happy you</h1>

    <p>Congrats. You created your first Website.</p>
  </body>
</html>